Friday, December 4, 2009

Brain Slices


As I write this, you can watch live streaming video of a frozen brain being sliced into sections for study at the Brain Observatory at the University of California, San Diego. The brain belongs to a man who lost his short-term memory after an operation to help his seizures.

From CNN:

A camera is taking a picture of each individual slice, and these pictures will also be made available on the Web. The goals are to map the human brain in new ways and correlate individual structures with specific functions such as memory.


Tuesday, December 1, 2009

Nature Art -- Big and Small


I finally got the chance to interview (via email) local nature writer/illustrator Carol Coogan. Read "How to Get Your Kids Out Drawing Nature" on GeekDad.

And The Micropolitan Museum of Microscopic Art Forms is a website featuring images of teeny tiny organisms. Here's their description:
For several centuries artists have depicted the human figure, still-lives, landscapes or non-figurative motifs. One subject has been widely neglected all those years: Micro-organisms!

The Micropolitan Museum finally exhibits these often overlooked works of art which are only visible with the aid of the microscope. Curator Wim van Egmond has collected the finest microscopic masterpieces nature has ever produced during eons of natural selection.
Reblog this post [with Zemanta]

Sunday, November 8, 2009

Great Kids Book about Triops


Photographer Lori Adams sent me
a review copy of the new book she produced with author Helen Pashley about triops. This book is the reference you'll need when you try raising these frisky little critters for yourself. It has all the information you'll need, plus lots of clear, well-marked photos so you can identify what you're seeing. I recommend it highly. Order it through Little Science books.

You can also order triops kits through Amazon or directly from Triassic Triops (but I get a small kickback from Amazon, and shipping is free)!

See my post about triops on GeekDad. The comments are pretty funny, too.

Thursday, November 5, 2009

Charlie's Playhouse - Toys that Teach Evolution

Thanks to my fellow GeekDad writer Jenny for pointing me towards Charlie's Playhouse, a toy company dedicated to games and learning tools about evolution. As Jenny writes:

The 24th of November is the 150th anniversary of the publication of Charles Darwin’s work, “On the Origin of Species by Means of Natural Selection, or the Preservation of Favoured Races in the Struggle for Life.” To celebrate this important anniversary, Charlie’s Playhouse, maker of evolution-inspired toys, play things and apparel, is inviting us all to ask our kids (age 4 to 10), “What is evolution?” They are hoping this will spark family discussion about evolution.


Friday, October 30, 2009

How Did Our Garden Grow?

Corn and Beans

This year's garden was eventful, and deserves a report:

1. The Three Sisters Garden worked great!

Following the directions from NativeTech, I planted corn, stringbeans and various kinds of squash Native American-style. We had way more corn than the previous year (although several ears never developed), and the beans were plentiful up until the first frost. In fact, the beans grew so well that the corn stalks began bending under the weight and had to propped up with stakes taken from the tomato patch (more on which below). I also got a lot of acorn squash (reminder to self: make menus to use up acorn squash in downstairs fridge) and a few zucchinis. I even got two pickings of pickles from the one vine that grew over by the compost pile. But most of the squash didn't thrive. Possible reasons: planted seeds too deep, critters ate seeds, powdery mildew, squash bugs. But all in all relatively easy and very rewarding. (Note for next year: deepen lower plot to move corn farther away from fence.)

2. Those poor tomatoes.

Tomatoes throughout the area had it rough this year. Tomato blight arrived early, thanks to plants shipped to the big-box stores. Although experts recommended pulling up all plants and discarding them, I kept a few which still had leaves and found that by the end of the season they each had produced several more small fruits (which I failed to harvest before the frost, sadly). The other weird thing was that somehow I ended up without a single regular round red tomato among all my varieties. And due to a mistake on the part of the farmer's market guy, the green zebra seedlings I bought turned out to be orange globes (which the husband pronounced unsuitable for sandwiches, for some reason). Not a total washout, not a great year.

3. What happened to all the pumpkins?

Last year we had pumpkins up the wazoo, just from throwing our old ones on the compost pile. This year, nada. Still had vines -- but they turned out to be plain little gourds, barely suitable for decorations. Went to our usual pumpkin place (across from the dairy farm we lived on years ago) to stock up, and the girl there said all the wet weather was not pumpkin-friendly. Well, there's always next year.

4. The herbs, the strawberries, the grapes, the apples.

The herb garden we created at our last house was so wonderful, I figured it would be easy to replicate. But so far, no luck. Even though herbs are billed as being suitable for shady spots, ours have not filled out. And with the non-stop rain, everything growing in the lower part of the backyard was pretty much drenched, if not underwater, throughout the entire season. I added some more ever-bearing strawberries, which turned out to have much larger fruit than the first batch (about half the size of a regular strawberry, as opposed to little wild-strawberry-sized fruit). They only produced a few, and sometimes the bunnies got to them before I did. I'd like to add more of those next spring. Of the two grape plants I put in by the pond, one died and the other survived but didn't fruit. The apple tree produced about a dozen apples, of which the squirrels got two. All were bumpy and funny-looking, but were OK when peeled and cooked.

Winter gardening: I still need to pull out the old plants and cut what herbs remain for drying. The carrots I planted in September seem to be doing OK; I plan to cover them and see if they are pickable in the winter. I also planted some lettuce in flower boxes on the porch rail, but the squirrels decided they were the perfect place to bury nuts.

Not sure about doing any hydroponics other than sprouts this winter, but I may try to grow something in one of the fish tanks. Still looking into it! Also hope to try some of the projects in Fresh Food from Small Spaces: The Square-Inch Gardener's Guide to Year-Round Growing, Fermenting, and Sprouting.

Sunday, October 4, 2009

New Blog - Home Physics!

It'll be a few more weeks before it really gets up and going, but I'm starting to add helpful links and info about learning physics at home to this year's science blog, Home Physics. Come visit! And feel free to comment with your favorite resources or suggestions.

Tuesday, September 29, 2009

Nature Drawing


I don't think I ever posted these drawings of tomato plants by my kids last winter. We have been inspired by the lovely illustrations of naturalist Carol Coogan, whose work is published weekly in our local newspaper.


Monday, August 31, 2009

Dobsonflies


This week's post at GeekDad is about the wetlands that used to be our backyard...

Friday, August 28, 2009

Zip Code Zoo


Here's a nature ID site that works by looking at the location of your internet service provider. (Didn't know websites could do that? I use a site called StatCounter to see who's visiting my various blogs. It gives a rough approximation of your city, among other info. And that's just the free, amateur version. Anyway...)

Here's what Zip Code Zoo has to say about itself:

Our natural world is rapidly losing its diversity and abundance. To slow this loss, and to better appreciate the natural world, we must begin with local nature. ZipcodeZoo works to bring the natural world to armchair, amateur, and professional naturalists. Our focus is Applied Biogeography: understanding plants and animals in their place, perhaps even your backyard.

Tuesday, August 25, 2009

Compost Tube - Final Report

This beautiful abstract from early July is the inside of the compost bottle. As you can see, some fungi took hold, along with the nematodes and bacteria that broke our vegetable scraps down into mush. A friend suggested using the liquid which collected in the bottom of the tube as "compost tea," so I poured it on my potted grape tomato plant. After photographing and disassembling the tube, I worked the contents into the tomato pot. (The tomato doesn't look great, but I don't know if that is the fault of the compost!)

Monday, August 10, 2009

Howard Hughes Medical Institute


Another interesting-looking resource for learning about biology is the Howard Hughes Medical Institute website. It has a section called Cool Science for teachers, parents and kids, and you can access free lectures via streaming video or by ordering the free DVDs.

Backyard Biology

Here's a website recommended by Robert Krampf:

Backyard Biology is a nature website written by a marine biology who works as a science educator at the Museum of Science in Boston, and an outdoor educator-turned-artist. Here's an excerpt from their bios:

When my good friend, Don asked if I would be interested in developing a web-site with him, the wheels started to turn. What fun it would be to combine art, natural history and writing as we share our mutual fascination with everything from aphids to zebras. We hope you will join us on frequent expeditions to our “backyards”.

Thursday, July 16, 2009

Your Tax Dollars at Work!

Hi Kathy,

Thanks for listing our booklet on your site:

Inside the Cell, an interactive online publication from National Institute of General Medical Sciences (also available as PDF)

You might be interested to know that, in addition to its online and PDF format, Inside the Cell is available free-of-charge as a full-color printed booklet. You can order it, and our other free science ed materials, at http://publications.nigms.nih.gov/order/ .

Even more print and online resources are at http://www.nigms.nih.gov/Publications/ . Everything is free-of-charge. (Your tax dollars at work.)

Best,

Alisa

Alisa Zapp Machalek
Science Writer and Editor
National Institutes of Health/NIGMS
301-496-7301 phone
alisa.machalek@nih.gov
http://publications.nigms.nih.gov/order/

Monday, June 29, 2009

Food Labs (Biochemistry)


Biological macromolecules like proteins, lipids (fats), and carbohydrates (sugars and starches)
are the building blocks of living cells. They also use them to store energy. This week, for biology, we made food samples, and tested them for fat and starch. Here is how we did it:


Fat Test
For the fat test, we tested samples of milk, butter, peanut butter, olive oil, Nutella, egg whites, an egg yolk, heavy cream, sunflower seeds, sesame seeds and yogurt. We also used water for the control sample. We tested them by taking a big piece of brown paper-bag-type paper, drawing squares for the samples, and spreading a little of each food in its square. We than waited for around 15 minutes for the food samples to dry. Once dry, any sample containing fat left a dark grease stain on the paper.


Starch Test
The starch test was slightly more complicated. For the starch test, we made samples of cooked pasta, bread, crackers, a blue chip, flour, a potato, sugar, corn starch. Again, we used water as a control. For the set-up, we took a small sample of each food, and put it in a small plastic cup. For the testing, we put a few drops of iodine on the sample. If the sample contained starch, the drops turned blue. This is because (from Wikipedia) "Starch forms an unstable complex (blue colored) in low concentrations of Iodine."


The potato after the Iodine was added.
As it's reacting with the starch,
the brown Iodine turns dark blue.


The sugar after the Iodine was added.
As you can see, the Iodine did not change color,
meaning that the sugar contains no starch.


One of the cracker samples we made after the iodine was added.
This sample has water added because we were trying to contrast it
with a cracker sample that we chewed up. The starch in the chewed-up
sample was supposed to convert to sugar via the enzymes in our saliva.
Unfortunately, we were unable to detect any difference
between the chewed-up sample and the regular sample.


A couple of days earlier, we made butter from heavy cream. All we did was put about half a cup of cream and a pinch of salt in a glass jar and shake it for roughly 15 minutes. First the cream became thick like whipped cream, then it separated into "buttermilk" and butter.

We followed these directions from Raft.net, which contain a simple explanation of what's happening. A more detailed chemical explanation is available at Butter Through the Ages.

Resources:

SEP: Testing for Lipids, Proteins and Carbohydrates
http://seplessons.ucsf.edu/node/362


Protein, Carbohydrate, Lipid Power Point http://teacher.edmonds.wednet.edu/mths/awelman/index.php?section=documents


Virtual Protein, Carbohydrate, Lipid Lab Tests
http://faculty.kirkwood.edu/apeterk/learningobjects/biologylabs.htm


Home Training Tools Food Lab
http://www.hometrainingtools.com/food-chemistry-projects/a/1591/


Tuesday, June 9, 2009

What's Living in Our Compost Tube?


We haven't observed any change in temperature, but the food scraps in our compost tube are definitely starting to rot. And things are growing: above, looking down the neck of the soda bottle, you can see an onion sprouting up from the pile. We also took a sample of the water which collects in the bottom of the tube and took a look under the microscope. Check out the videos below:


Here you can see some of the microorganisms living in our compost pile at 40X magnification, shot with a small hand-held digital camera. The worm above is called a nematode. Cornell's Department of Crop and Soil Science has a page about compost inhabitants. They also have an online guide called Composting in the Classroom: Scientific Inquiry for High School Students which we haven't checked out yet but will.


Above is a 400X magnification of the kidney-shaped organisms, which are probably protozoa. Here's a page about Microbial Decomposers, with microphotos, from the city of Euless, Texas.

Tuesday, June 2, 2009

Soda Bottle Compost

This week, we did another experiment having to do with bacteria and other microbes: a compost column. The purpose being to show how microbes in the soil break down old plants and turn it into fertilizer. A regular compost pile, like the one by our backyard vegetable garden, is made up of old leaves and grass cuttings. The documentary "Unseen Life on Earth" mentioned a town that was using a compost pile as its trash pile by burying it in microbe-rich soil. It could decompose all the trash in a couple of years and got up to temperatures of about 140 degrees Fahrenheit.


For our compost tube, we took some old soda bottles, cut them up to make the column, put food scraps in it, and left it for a few days to decompose. We changed the directions a little, but here is the link to the original instructions.

· 2 clear, plastic, 2-liter soda bottles, one with a cap

· Nylon netting or pantyhose

· Rubber band

· Push pin

· Metal skewer or nail

· Wide packing or masking tape

· Coffee filter - basket type

· Scissors and/or box cutter

· Soil

· Vegetable and fruit scraps

· Meat thermometer

· Waterproof marking pen

1. Rinse the soda bottles. Cut the first bottle around the middle. Set the bottom half aside.

2. Take the top half of the bottle and cut again where it widens out. DO NOT CUT ALL THE WAY AROUND. Leave a flap that will act as a hinge, so you can open the top. Set aside.

3. Cut the bottom off the second bottle just above the curve. Discard the bottom.

4. Wrap the netting over the mouth of the bottle and fasten it below the neck with the rubber band.

5. Poke a hole in the top of the cap with the skewer or nail. If you heat the skewer over the stove you can melt a hole through the cap. Make it big enough to slip in the meat thermometer.

6. With the push pin, poke holes in the second bottle all around the sides to allow air to flow into the column. Do the same with with the top of the first bottle.

7. Take the second bottle with the netting and set it upside-down inside the bottom of the first bottle. Place a coffee filter inside the upside-down bottle so it covers the opening.

8. Fit the top of the first bottle inside the upside-down bottle so they form a long column. You may need to cut small V-shapes in the edge of the inner bottle so it lies flat. Use clear packing tape inside and out to fasten the two bottles together. You may need to re-open some of the holes with the push pin.

9. Bend back the hinged top of the uppermost bottle. Fill the column with fruit and vegetable scraps. You can add any plant matter, including leaves from houseplants. Sprinkle some soil over the scraps, and shake or poke down so it’s evenly mixed. If it’s dry, add some water.

10. Close the hinged top and fasten with tape. Screw on the cap. Insert the meat thermometer. Mark the height of the material in the column with the pen, and write down the date.

11. Put the compost column in a place where it can be observed for several weeks without smelling up the house. Check it regularly to see if the height or temperature changes and to see what is happening to the plant material inside.

Tuesday, May 26, 2009

Growing Bacteria Cultures

The ingredients and the bacterial smear of the window.

We tried a couple of formulas for homemade growth medium in which we could grow bacteria cultures. In real labs, a vegetable product called agar is used to make a gel. The agar is melted and poured into Petri dishes, and then chilled until it solidifies again. To get bacteria samples, a sterile cotton swab is rubbed across a surface. Then the dish is streaked by rubbing the swab in a zigzag pattern across the agar. It is set aside in a warm place and allowed to grow for several days.

The first formula was from The Science of Life by Frank G. Bottone, Jr. It used combined flavored Jello and SlimFast diet drink. Instead of Petri dishes, we used small plastic cups (the kind they put ketchup in at fast food places) covered with clear plastic wrap held on with a rubber band. For the sterile swabs, we took Q-Tips and dipped them in a cup of boiling water. Sadly, this formula grew mold but no bacteria.


Stirring the gelatin.

We had better luck with the second formula. It came from a website called Science in the Real World and was designed by biologist Teresa Thiel of the University of Missouri. It used unflavored gelatin, beef boullion cubes and sugar. We used bacteria from yogurt, a toilet, the stem of our hydroponic tomato plant, the inside of one of our mouths, the inside of our refrigerator, the inside of our fish tank, a window, the inside of one of our navels, some dirt from our back yard, the kitchen counter, a sock, and one of our fingers.

The naval smear and the finger smear at 7 days.


The dirt smear after 2 days and after 7 days. The fuzz on the right is mold.

The plant smear and window smear (see top) at 7 days.

At the end of the week, we're going to dispose of the smears and bleach out the box so that any possible escaped bacteria won't start infecting our house.

Saturday, May 23, 2009

Yogurt


This week for Biology, we made yogurt using a bacterial process. The bacteria ferments the yogurt by converting milk sugar to lactic acid. We used store-bought yogurt as starter to introduce the bacteria into the milk. The milk is heated to kill off bad bacteria and to alter the proteins to give it a better consistency.


There isn't much to do for this experiment so the instructions are in the photo captions.
Source: New York Times. You can also read more about the biology of yogurt making here.


The Ingredients: All you need is some yogurt, milk, a closed container, something to keep it warm, and a candy thermometer.


Put 3 1/2 cups of milk in a pan and heat.


The milk's temperature being tested. You want it to go up to 180 degrees.


Then put the pan inside a larger pan filled with cold water. Cool the milk down to 120 degrees.


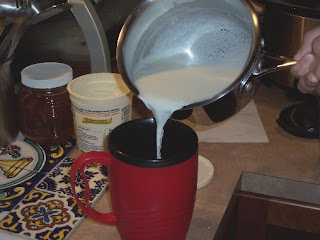
The yogurt being poured into the container -- a quart-sized travel mug.
You want to mix in about about 2 tablespoons of yogurt to one quart or less milk.


Keep the container warm for about 12 hours. We put ours in an insulated lunch cooler.
When it's done, put it in the refrigerator. Homemade yogurt will keep for one week. Enjoy!

Friday, May 22, 2009

Foraging


Last week's post for GeekDad featured Wildman Steve Brill, the famous New York City expert on edible weeds and plants. Brill gives tours of parks in the metropolitan NY area. Maybe someday we'll catch one. In the meantime, I'm putting his site in the sidebar in the hopes I work up the nerve to try a wild backyard salad...

Brill has a book you can buy, but on his website there's a wonderful section for kids. He also recommends these Wild Cards. I'm ordering a set. They'll come in handy.