Tuesday, May 26, 2009

Growing Bacteria Cultures

The ingredients and the bacterial smear of the window.

We tried a couple of formulas for homemade growth medium in which we could grow bacteria cultures. In real labs, a vegetable product called agar is used to make a gel. The agar is melted and poured into Petri dishes, and then chilled until it solidifies again. To get bacteria samples, a sterile cotton swab is rubbed across a surface. Then the dish is streaked by rubbing the swab in a zigzag pattern across the agar. It is set aside in a warm place and allowed to grow for several days.

The first formula was from The Science of Life by Frank G. Bottone, Jr. It used combined flavored Jello and SlimFast diet drink. Instead of Petri dishes, we used small plastic cups (the kind they put ketchup in at fast food places) covered with clear plastic wrap held on with a rubber band. For the sterile swabs, we took Q-Tips and dipped them in a cup of boiling water. Sadly, this formula grew mold but no bacteria.


Stirring the gelatin.

We had better luck with the second formula. It came from a website called Science in the Real World and was designed by biologist Teresa Thiel of the University of Missouri. It used unflavored gelatin, beef boullion cubes and sugar. We used bacteria from yogurt, a toilet, the stem of our hydroponic tomato plant, the inside of one of our mouths, the inside of our refrigerator, the inside of our fish tank, a window, the inside of one of our navels, some dirt from our back yard, the kitchen counter, a sock, and one of our fingers.

The naval smear and the finger smear at 7 days.


The dirt smear after 2 days and after 7 days. The fuzz on the right is mold.

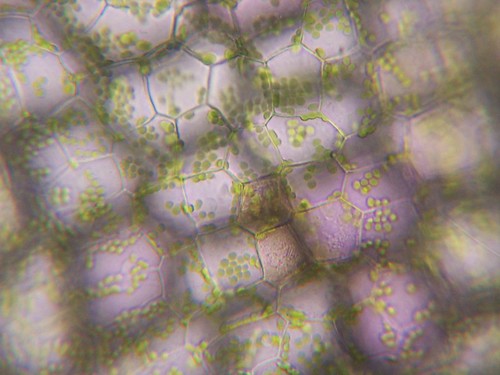
The plant smear and window smear (see top) at 7 days.

At the end of the week, we're going to dispose of the smears and bleach out the box so that any possible escaped bacteria won't start infecting our house.

Saturday, May 23, 2009

Yogurt


This week for Biology, we made yogurt using a bacterial process. The bacteria ferments the yogurt by converting milk sugar to lactic acid. We used store-bought yogurt as starter to introduce the bacteria into the milk. The milk is heated to kill off bad bacteria and to alter the proteins to give it a better consistency.


There isn't much to do for this experiment so the instructions are in the photo captions.
Source: New York Times. You can also read more about the biology of yogurt making here.


The Ingredients: All you need is some yogurt, milk, a closed container, something to keep it warm, and a candy thermometer.


Put 3 1/2 cups of milk in a pan and heat.


The milk's temperature being tested. You want it to go up to 180 degrees.


Then put the pan inside a larger pan filled with cold water. Cool the milk down to 120 degrees.


The yogurt being poured into the container -- a quart-sized travel mug.
You want to mix in about about 2 tablespoons of yogurt to one quart or less milk.


Keep the container warm for about 12 hours. We put ours in an insulated lunch cooler.
When it's done, put it in the refrigerator. Homemade yogurt will keep for one week. Enjoy!

Friday, May 22, 2009

Foraging


Last week's post for GeekDad featured Wildman Steve Brill, the famous New York City expert on edible weeds and plants. Brill gives tours of parks in the metropolitan NY area. Maybe someday we'll catch one. In the meantime, I'm putting his site in the sidebar in the hopes I work up the nerve to try a wild backyard salad...

Brill has a book you can buy, but on his website there's a wonderful section for kids. He also recommends these Wild Cards. I'm ordering a set. They'll come in handy.

Tuesday, May 19, 2009


In the Wall Street Journal today:

In Attics and Closets, 'Biohackers' Discover Their Inner Frankenstein
Using Mail-Order DNA and Iguana Heaters, Hobbyists Brew New Life Forms; Is It Risky?


(Something to worry about if you're too successful in getting your kids interested in biology!)

See also my post on DIYbio.

Sunday, May 17, 2009

Science in the Real World: Microbes in Action

activities

The Science in the Real World: Microbes in Action website is a resource for K-12 teachers. It has classroom activities for all levels, which look easy to do and use readily available materials, as well as tips and techniques for preparing baterial cultures. We're going to try preparing petri dishes using "agar" made from gelatin and beef bullion this week. (So far we haven't gotten any growth on dishes we made last week using a recipe of flavored Jello and Slim Fast...)

The website comes from the University of Missouri in St. Louis.

Monday, May 11, 2009

Cells


This week, for biology, we learned about cells. We have been watching some of the videos here, and we watched two movies about cell death (Death By Design and The Life and Times of Life and Times, as mentioned in the previous post.) We decided to look at some different things under our microscope.

First, we looked at an onion skin. We took two pieces from the bottom layer of an onion, and we put them on two different slides. With one, we put some Iodine on the slide so we could see the different layers, and the other we didn't use Iodine on. Here are some of the pictures we took:


The slide without Iodine at x100


The slide with Iodine at x100


Onion Cell Lab Instructions.

  1. Add 2 drops of iodine to the center of a glass slide. Be careful! Iodine can stain your clothes.
  2. Take a small piece of onion. Use tweezers to peel off the skin from the underside (the rough, white side) of the onion. Throw the rest of the onion piece away.
  3. Carefully lay the onion skin flat in the center of the slide on top of the iodine.
  4. Add 2 drops of iodine to the top of the onion skin.
  5. Stand a thin glass cover slip on its edge near the onion skin, next to the drop of iodine.
  6. Slowly lower the other side of the cover slip until it covers the onion skin completely. If there are air bubbles, gently tap on the glass to “chase” them out.
The second lab we did was our fishtank plants. Having two tanks we took a sample from both, it was quite simple to set up, we merely put a small leaf with a couple drops of water on a slide. Photos below:


Leaf cell plant at x400


Leaf at x40

Plant Cell Lab Instructions

  1. Tear off one small leaf/stem from the plants in the fish tank.
  2. Add one drop of tap water to the slide.
  3. Stand a thin glass cover slip on its edge near the leaf, next to the drop of water.
  4. Slowly lower the other side of the cover slip until it covers the leaf completely. Make sure there are no air bubbles.
The last lab we did was human skin cells. This was an interesting lab to do, we looked at three different samples of cheek cells, though there wasn't much difference between the cells. Photo:


The cheek cells at x400

Human Cheek Cell Lab Instructions

  1. Add one drop of methylene blue to the middle of a clean slide. Be careful! Methylene blue will stain your clothes and skin.
  2. Use the flat side of a toothpick to gently scratch the inside of your cheek. DO NOT GOUGE YOUR CHEEK - you don’t need chunks of skin and definitely don’t want to draw blood.
  3. Gently touch the toothpick to the drop of dye on the slide. Some of your cheek cells should drift off into the dye.
  4. Throw the toothpick away.
  5. Stand a thin glass cover slip on its edge near the drop of dye.
  6. Slowly lower the other side of the cover slip until it covers the dye completely. Make sure there are no air bubbles.

Links:
My Science Box (Source of experiments)


Monday, May 4, 2009

A Nobel-Winning Home Biologist


"I should thank Mussolini for having declared me to be of an inferior race. This led me to the joy of working, not any more unfortunately, in university institutes but in a bedroom." -- Rita Levi-Montalcini
Last night we watched Death by Design, a 1996 documentary that explains programmed cell death in a very entertaining manner. Interspersed with interviews with biologists from the US, France, Germany and Italy are scenes from old comedies that illustrate metaphorically what the scientist is discussing. Together with the lively score it made for a very interesting 70 minutes.

One of the most interesting segments was an interview with Nobel Prize winning scientist Rita Levi-Montalcini. Levi-Montalcini, who celebrated her 100th birthday on April 22, is still active as a scientist and as a life-long member of the Italian parliament. The daughter of Adamo Levi, an electrical engineer and gifted mathematician, and Adele Montalcini, a talented painter, Levi-Montalcini had to convince her traditionalist father to allow her to pursue a University education. (Her twin sister Paola, an accomplished painter who also appears in the film and who died in 2000, was allowed to study art, which her father did not feel would interfere with her future duties as a wife and mother.)

In 1936, Levi-Montalcini had graduated from medical school and was trying to decide whether to go into practice or research when World War II intervened. The Italian dictator Benito Mussolini decreed that Jews like the Levi-Montalcinis could no longer work in academic or professional careers. Rather than fleeing to the United States, the family decided to stay in Italy and work at home. Levi-Montalcini set up a laboratory in her bedroom and began studying the development of chicken embryos.

As the film explains (if I understand it correctly), it had been shown many times that cells "commit suicide" when given a signal by the rest of the organism, but those findings had never been considered important. But as she says in the film, Levi-Montalcini likes to work by intuition. She sees a connection between scientific investigation and art. (Her twin Paola, also shown in the film, was likewise often inspired by her sister's research.) And the armies clashing around them made the idea of organized death even more concrete. (The family had to pack up their life and work and leave their hometown of Turin for the hills when fighting got too intense.) Working in her bedroom lab, Levi-Montalcini was the first to study how embryos shape themselves during development by creating more cells than are needed in the mature organism and signaling certain cells to die. She was awarded the Nobel Prize in Physiology in 1986.

I just loved learning Levi-Montalcini's remarkable story. It shows what you can accomplish simply working at home. I especially love how the sisters' work in art and science influenced each other. I've started looking into their story further with the intention of turning it into a children's book. I'll keep you posted!